ROS (Robot Operating System) is a software framework that provides packages, and tools to better program, operate, and control robots. Think of ROS as a huge, ever-expanding web connecting virtually every possible robotics software tool in an easy-to-use, open-source format. More precisely, “ROS is an open-source, meta-operating system for your robot. It provides the user with services such as hardware abstraction, low-level device control, implementation of commonly-used functionality, message-passing between processes, and package management. It also provides tools and libraries for obtaining, building, writing, and running code across multiple robots and multiple computers“.
The best way to learn this tool is, of course, to refer to the official docs called ROS Wiki. But ROS Wiki can at times be a bit long-winded, disconnected, and hard to follow. My goal with this blog is to provide both a theoretical and an implementation-based understanding of the core essentials of ROS. These essential concepts are explained through multiple “Beginner Level” tutorials on the ROS Wiki website. With this blog, you can essentially get a complete functional summary of these first 20 beginner-level tutorials in approximately 15 minutes. So, if you’re starting out, or are just planning to refresh your understanding of the fundamentals, buckle up!
Installation
At any given time, there are always multiple ROS distributions available for installation. As of today (Jan 2022) the latest long term support version is called ROS Noetic. I highly recommend using Noetic since it’s the first distro to officially support Python 3. The ones before this (ROS Melodic, Kinetic etc.) can be built from source and then modified to use with Python 3 but I don’t see why you’d want to do that. It’s recommended that you install this alongside Ubuntu 20.04 however there are a few other operating systems that are supported on an experimental basis. There’s also something called ROS2 but for beginners, ROS1 is honestly more than you’d need. If you still feel like checking it out and then making an informed decision then feel free to take a look at the differences between the two (ROS1 vs. ROS2, The Construct | Robotics Backend). Finally, you will also need to know how to work your way around a Linux based operating system. Check out these tutorials to understand how to work with command-line operations in Linux (UNIX Tutorial | Official Linux Website).
Installing ROS is pretty straightforward. Just follow the steps from the installation guide on ROS Wiki. The installation steps are as follows (the commands mentioned below work with Ubuntu).
1. Allow packages to be installed from repositories categorised as restricted, universe, and multiverse. These categories are defined based on where the package comes from and whether or not it is proprietary. They are explained in depth over here but it’s generally safe to just allow installation from any of them. You can change these settings from the Software & Updates GUI in Ubuntu.
2. Set up the sources list and the keys. These commands set up your computer to accept software packages from the main ros repository. Keys are needed to securely connect to the repo and download the content.
$ sudo sh -c 'echo "deb http://packages.ros.org/ros/ubuntu $(lsb_release -sc) main" > /etc/apt/sources.list.d/ros-latest.list'

$ sudo apt install curl

$ curl -s https://raw.githubusercontent.com/ros/rosdistro/master/ros.asc | sudo apt-key add –

$ sudo apt update
3. Install the full version of ROS Noetic with the following command. I recommend the full version because it’s just easier to get a few additional packages now instead of having to install them one by one later.
$ sudo apt install ros-noetic-desktop-full4. Now that ROS is installed, there’s one final thing that you need to do every time you wish to use it. This step is called sourcing the setup script. Run the following snippet in the terminal.
$ source /opt/ros/noetic/setup.bash When you “source” a bash script, you essentially just execute each line of that script as if it were typed into the current shell one at a time. The setup.bash script simply adds environment variables to your current path to allow ROS to function. Environment variables are used by programs to perform essential processes and are imperative for the proper functioning of most software programs. Run the following command to check if the environment variables have been added. They should be, if you’ve sourced the setup.bash file. What the environment variables exactly do is a bit out of the scope of this tutorial, but feel free to read up more about them over here (Medium Article | YouTube Tutorial).
$ printenv | grep ROS Note that you’ll need to source the main ROS installation every time you open up a new shell and intend to use ROS commands. A simple way to not have to do this is to add this sourcing command directly to your system’s bash script. The bash.rc script is executed each time a new shell terminal is launched. Hence, if your ROS sourcing command is added there, it’ll automatically source ROS every time you open up a new shell terminal. To do this run the following commands.
$ echo "source /opt/ros/noetic/setup.bash" >> ~/.bashrc

$ source ~/.bashrc
5. At this point, you’re basically done. You can start using ROS right away. However, you might also want to add just a few more necessary dependencies. These aren’t really needed to work with ROS but make it much easier for you to work with other ROS functionality.
$ sudo apt install python3-rosdep python3-rosinstall python3-rosinstall-generator python3-wstool build-essential

$ sudo apt install python3-rosdep

$ sudo rosdep init

$ rosdep update
6. As a side note, when working with ROS, you’ll be using a lot of terminal windows. Too many to track with the default separate terminals in Ubuntu! To get over this, I suggest using some sort of a terminal emulator that lets you run multiple terminal instances in a single tab. You can install Terminator using the following commands.
$ sudo add-apt-repository ppa:gnome-terminator

$ sudo apt-get update

$ sudo apt-get install terminator
ROS Workspaces
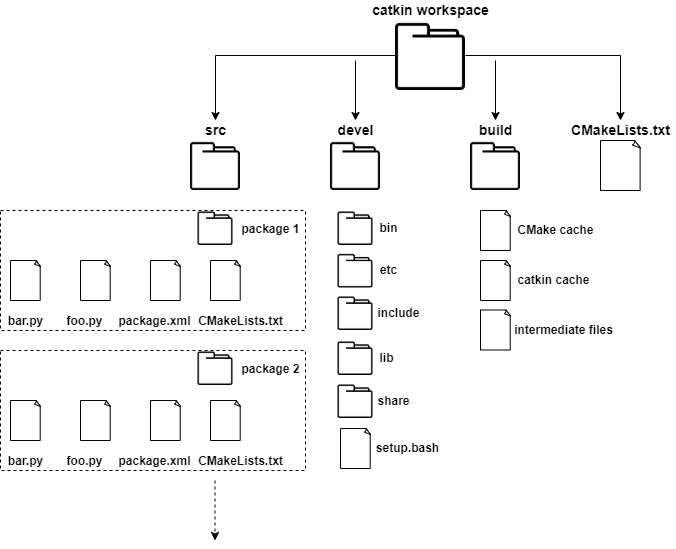
Everything inside of ROS exists in something called a catkin workspace. Workspaces are simply folders where you modify, build, and install ROS packages. A ROS package is where you place your code. A typical catkin workspace looks something like this.
To make a workspace, choose a directory on your system where you wish to place the workspace and create a workspace folder. Create another directory inside of it called src for housing all your source code. Now change to the main workspace directory and run catkin_make. The following commands do just this.
$ mkdir <workspace name>

$ cd workspace_name

$ mkdir src

$ catkin_make
catkin_make is the command that you use to build workspaces. From here onwards, anytime you make any changes inside this workspace, you must first run catkin_make to build the workspace. Running it for the first time in an empty workspace creates the devel and build folders and adds a CMakeLists.txt link. Notice that the devel folder has a setup.bash script inside it. To start using this workspace you must first source this script by running the following command.
$ source ~/workspace_name/devel/setup.bashBefore explaining what the different folders and files in the workspace exactly are, I’ll first quickly explain something called overlays and tell you the idea behind having to source a workspace. It is possible to have multiple catkin workspaces on a system at the same time. These workspaces can function totally independent of one another and can have their own build processes running independently. When you source a workspace, you’re doing something called overlaying. Overlaying refers to building and using a ROS package from source on top of an existing version of that same package. In this way your new or modified version of the package "overlays" the installed one. Here, your new workspace overlays from the main ROS installation on your system. Basically, by doing this you’re specifying to ROS that you wish to develop code inside of this particular workspace.
By running the source command , you add the environment variables of that workspace to your system. Hence, any ROS commands that you run after sourcing, work as if this workspace is the only one present on your system. To verify that your workspace is properly overlayed by the setup script, make sure the ROS_PACKAGE_PATH environment variable includes the directory your workspace is placed in. To do this run,
$ echo $ROS_PACKAGE_PATHThe output should look something like the one below, where where the red text is the path to the overlayed workspace and the blue text is the path to the main ROS installation from which the overlayed one is created. Overlaying is not really a “beginner level” ROS concept but I think at least a basic understanding of the ideas behind it helps better understand why we have to do some of the things we did here. For a deeper explanation of overlaying please refer to the overlaying explanation on ROS Wiki.
$ /home/youruser/workspace_name/src:/opt/ros/noetic/shareFinally, let me just quickly explain what each of the files and folders inside of this workspace are. The file CMakeLists.txt is the input to the CMake build system for building software packages. Any CMake-compliant package contains one or more CMakeLists.txt file that describes how to build the code and where to install it to. CMake is an open-source, cross-platform family of tools designed to build, test and package software. It is used to control the software compilation process using simple platform and compiler independent configuration files, and generate native makefiles and workspaces that can be used in the compiler environment of your choice. All you need to know about this file is that it sits inside the source space and in each package and contains information that is utilised while building the package or the workspace.
The source space contains all your packages and all the code that you write. This is where you create new packages or clone ones from the open-source package index. Each folder inside of this is an individual package. The root of the space and each package inside it has a symbolic link to the CMakeLists.txt file of the top-level folder. The build space is where CMake is invoked to build the catkin packages in the source space. CMake and catkin keep their cache information and other intermediate files here. The development space (or devel space) is where built targets are placed prior to being installed. What build targets are is honestly a bit out of the scope of this tutorial but just know that the devel space houses pre-installation information in a useful manner facilitating future testing and development.
Packages in ROS
A package in ROS is a low level, independent, shareable directory that contains source code to implement some function. Packages are designed to be fully independent units of code and are formatted in a way that facilitates easy sharing. This easy sharing of code is fundamentally what makes ROS so useful. For example, you can make a ROS package to read and transmit data from a gyroscopic sensor. Now, anyone in the world who wishes to incorporate a gyro sensor into their robot can simply clone this package, build it and start using it with their own system in just a matter of minutes.
To enable such a high level of compatibility, ROS uses a framework of nodes, topics, and messages. All you need to know about a package is the node it creates, the messages it transmits and the topic it publishes to. Once you know these few things, you can simply plug in a package and start working with its topics and messages. Now, if this sounds a bit confusing then don’t worry. The next section will clearly explain what nodes, topics and messages are. For now, I’ll just move ahead with packages.
Every package in ROS has a package manifest file, a CMakeLists.txt link to the root source space and then all of its source code. Packages can also have other folders containing a lot more code but they generally should have at least these three things. The manifest file will be something called package.xml and it contains a bunch of metadata such as the name of the package, the version, the developer’s details, license information etc. ROS command such as rospack use this manifest file to locate and work with package information. I’ve already explained CMakeLists.txt above.
To create a package, cd into the source space and run the catkin_create_pkg command
$ cd ~/workspace_name/src

$ catkin_create_pkg [package name] [depend1] [depend2] … [depend n]
This creates a package and the manifest file along with it. The manifest contains information about the package’s dependencies. You can always add more dependencies manually. Dependencies are chosen based on what you wish to do with the package. For now, you can include rospy and roscpp to work with ROS nodes (more on these in the next sections) written in both Python and C++. You can also add dependencies such as the standard messages package std_msgs or the geometry messages package geometry_msgs. You can also use another custom package as a dependency. Dependencies are categorised as per their usage. These are build_depends, run_depends, exec_depends and buildtool_depends. What these categories are is explained in-depth over here. At this point, you can also edit the manifest file to add information such as the package name, the version, the licence etc.
Before you can use the package or even use ROS commands to work with it, you must first build it. Go back to the main workspace directory and run catkin_make. After building, remember to also source the workspace.
& cd ~/workspace_name

$ catkin_make
ROS Nodes, Topics & Messages
This section explains the fundamental structure that enables ROS users to quickly develop packages, share code, and stack up multiple layers of functionality.
The ROS framework exists in a graph-like structure. In mathematics, a graph is simply a collection of points connected by line segments. The points (also called nodes) are the key areas of interest and the line segments (also called edges) connect different nodes to enable the sharing of information and services. For example, the internet is a big graph where users are nodes and the internet connection acts as an edge to facilitate the transfer of information such as text, pictures, videos etc. Another example is the rail transport network, where the nodes are railway stations, the edges are railway lines, and the things being transported are goods and people.
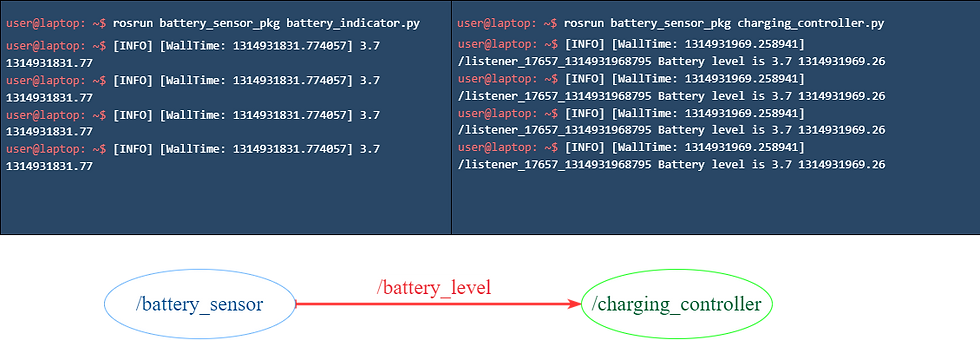
Similar to these graphs, in a ROS framework, a node is a process or an executable that performs some computation. There can be a lot of nodes in a typical ROS system. For example, you can write a python script to make a ROS node control a range-finder, or to control the robot's wheel motors, or to perform localization, or for path planning. Nodes communicate with other nodes via something called topics. There is no one-to-one communication between two nodes. Nodes instead “publish to” or “subscribe to” topics. Hence, one node (say for example a joint angle sensor) first “publishes” its information to the topic (say for example the joint angle topic). Simultaneously a second node (say the motor controller) then “subscribes” to this topic to read the information sent out by the first node and then run some other process (say to start/stop a joint motor).
Topics are categorised by the information they contain. This information is called a message. Hence, when the joint sensor node sent out the joint angles to the joint angle topic, it published a joint angle message to that topic. The motor controller node then viewed the joint angle message from the topic to decide what to do with the motors. The joint angle topic is hence also defined by the type of message it contains (namely a joint angle vector of some specific data type). A great analogy for this process is how we use television. A TV user (node) can subscribe to multiple channels (topics) that are receiving various TV signals (messages) from a broadcaster (node). For instance, the Star Sports node “publishes” the live FIFA World cup to the Star Sports topic while, you the user node, subscribe to the Star Sports topic to receive the TV signal information.
There is also another entity called the ROS master which keeps track of all the nodes and topics. The main job of the ROS master is to enable individual ROS nodes to locate one another. Once these nodes have located each other they communicate with each other peer-to-peer through topics. The Master is most commonly run using the roscore command, which loads the ROS master along with other essential components. In our television analogy, the ROS master is similar to a TV service provider like DishTV or TataSky.
ROS Services & Parameters
Messages are not the only way that two nodes can communicate with each other. In situations where the information to be sent and received is just temporal, messages and topics can become unnecessary additions to the ROS network. Furthermore, the publish/subscribe framework is a many-to-many system where multiple nodes can publish to and subscribe from a topic. It is also a one-way transport of information. To alleviate these problems and to facilitate one-to-one, two-way transport of short-lived information, ROS has the notion of a service.
Services enable a request/reply framework defined by a pair of messages: one for the request and one for the reply. A providing node offers a service under a name and a client uses the service by sending the request message and awaiting the reply. For example, let’s say you wish to spawn a robot in simulation. In such a case, the spawn call is just a one-time thing as you probably would not be needing to spawn robots multiple times at a super high frequency. In such a case, you call a service using a spawner node. This spawner node then requests the service to the simulation software node. Once the robot is spawned, the service is completed and that’s the end of the correspondence between those two nodes.
ROS also has this concept of a parameter server. This is a shared dictionary that stores parameters used at runtime. Nodes use the param server to store static, non-binary information such as configuration data. For instance, if you’re trying to work with robots in simulation, the simulation software’s nodes might store the gravity vector as a parameter on the ROS parameter server.
Working in ROS
Similar to how Linux has its shell commands, ROS too has its own command-line commands. These commands help the user work with ROS functionality and are integral to the very use of the framework. Below, you can find a detailed list of the most essential ROS commands with short explanations and usage examples. Feel free to use this list as a cheatsheet while you’re getting started. Eventually, you’ll be able to recall most of them just from memory!
rospack (documentation)
rospack is used to work with ROS packages. It helps you keep track of packages and their dependencies. rospack works by creating a directory tree of all package paths by looking at environment variables and package manifest files.
roscd
roscd is used to directly change directory to a certain file/folder in the ROS workspace.
rosls & roscp
rosls is similar to the Linux ls command. It lets you directly list the contents of a directory in the ROS workspace. roscp lets you directly copy files that are inside a ROS workspace.
rosed
rosed lets you directly edit a file inside a package without having to cd into it.
rosrun
rosrun allows you to execute an executable without having to explicitly cd into that directory. This is the default way to run scripts with ROS. More on its usage in the following sections.
rosnode (documentation)
rosnode is a command that lets you manage nodes in ROS.
rostopic (documentation)
rostopic is a command that helps you work with topics in ROS.
rosmsg (documentation)
rosmsg lets you work with messages in ROS.
rosservice (documentation)
rosservice helps you manage services in ROS.
rosparam (documentation)
rosparam lets you work with parameters on the ROS parameter server.
rqt_graph & rqt_plot (documentation A | B)
rqt is a package that lets you visualise the current network of nodes and topics in ROS. It’s a great visual tool to just intuitively understand what’s happening in the system and to see the actual connections that are passing messages. To install it, run the following commands.
$ sudo apt-get install ros-noetic-rqt

$ sudo apt-get install ros-noetic-rqt-common-plugins
After installation, run the following commands to visualise the ROS network and the messages being sent to topics.
$ rosrun rqt_graph rqt_graph

$ rosrun rqt_plot rqt_plot
General Tips
Most ROS commands support tab completion. Press tab once to complete and twice to see the available completion options.
Make sure to source your workspace to enable using these commands
If errors arise saying packages are not found, you might have forgotten to build your workspace after adding new packages. Try running catkin_make
Simple Publisher & Subscriber
Okay, so the tutorial up until this point has been fairly theoretical and concept-oriented. Now is when we cross over to the implementation side of things. In this section, we’ll be writing a ROS package from scratch. We’ll first follow what we had learnt in the packages section to make an empty package. Then we’ll be populating it with a publisher and a subscriber node and see how they interact across the ROS network. Note that I’m explaining the code in Python however, you can also do the same stuff in C++. The code is of course a bit different but the core concepts remain the same. Check out the ROS wiki for C++ code examples. Alright let's first create our package. Before you start, make sure you have created the catkin workspace, built it for the first time and then sourced it. We'll be creating a battery sensor package.
$ catkin_create_pkg battery_sensor_pkg rospy roscpp std_msgsThis creates your ROS package to work with both python and C++ scripts and sets up the ROS standard messages library as a dependency. Now, go back to the root of the workspace and build this package using catkin_make and remember to source the workspace again. Now change directories into the source directory of the package. This is where you store all your code. You can of course also make a new folder to store your scripts and categorise them by type but that’s totally up to your preference. The recommended convention is to use to the source folder or to just make a new folder called scripts. Here we'll create our publisher and subscriber scripts.
$ roscd battery_sensor_pkg/src

$ nano battery_indicator.py

$ nano charging_controller.py
After creating the packages, you can paste the following code in both the scripts. Also remember to convert both of them to executables using chmod and then to build and source the workspace.
$ chmod +x battery_indicator.py

$ chmod +x charging_controller.py

$ cd ~/workspace_name

$ catkin_make

$ source devel/setup.bash
To run your nodes, first run roscore and then use rosrun to run each of the nodes in a separate terminal window. The output should look something like this. You can also use rqt_graph to visualise the ROS network.
And that's it, you've officially learnt the basics of ROS. There are just a few more things that you might want to try. For example, I've skipped past topics like bag files and launch files. Those concepts are fairly simple and you can learn them super quickly. You can also try to expand on the above-mentioned publisher and subscriber nodes to make something that's actually useful. Additionally you can try to make your own service/client network too. There's a tutorial on that on the ROS wiki website. Finally, the best way to really reinforce your understanding of these concepts is to apply them to an actual robotics project. I think that a great way to do this is to work on a Simulation setup with ROS. Feel free to checkout the Gazebo Simulation software, RViz, and the ROS navigation stack. Those are all great starting points. Hope you found the article helpful!
Comments